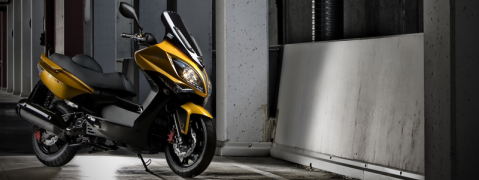
 Kawasaki J300 - Owner's Manual > Battery
The battery installed in this motorcycle is a sealed type, so it is not necessary to check the battery electrolyte level or add distilled water.
NOTICE
Never remove the sealing strip, or the battery can be damaged.
Do not install a conventional battery in this motorcycle, or the electrical system cannot work properly.

Battery Maintenance
It is the owner's responsibility to keep the battery fully charged. Failure to do so can lead to battery failure and leave you stranded.
If you are riding your vehicle infrequently, inspect the battery voltage weekly using a voltmeter. If it drops below 12.8 volts, the battery should be charged using an appropriate charger (check with your Kawasaki dealer). If you will not be using the motorcycle for longer than two weeks, the battery should be charged using an appropriate charger. Do not use an automotive-type quick charger that may overcharge the battery and damage it.
NOTE
- Leaving the battery connected causes the electrical components (clock etc.) to make the battery discharged, resulting the over discharge of the battery. In this case, the repair or replacement of the battery is not included in the warranty. If you do not drive for four weeks or more, disconnect the battery from the vehicle.
Kawasaki-recommended chargers are:
Battery Mate 150-9
OptiMate 4
Yuasa MB-2040/2060
Christie C10122S
If the above chargers are not available, use equivalent one.
For more details, ask your Kawasaki dealer.
Battery Charging
- Charge the battery following the instructions of your battery charger.
- The charger will keep the battery fully charged until you are ready to reinstall the battery in the motorcycle (see Battery Installation).
DANGER
Battery acid generates hydrogen gas which is flammable and explosive under certain conditions.
It is present within a battery at all times, even in a discharged condition.
Keep all flames and sparks away from the battery.
Wear eye protection when working with a battery. In the event of battery acid contact with skin, eyes, or clothing, wash the affected areas immediately with water for at least 5 minutes. Seek medical attention.
Battery Removal
- Open the seat.
- Make sure the ignition switch is turned off.
- Remove the screws and pull up the battery cover.

- Screws
- Battery Cover
- Remove the bolts, and remove the battery case cover.
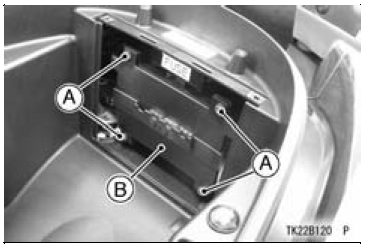
- Bolts
- Battery Case Cover
- Remove the protective cap the (+) terminal.
- Disconnect the cables from the battery, first from the (-) terminal and then the (+) terminal.
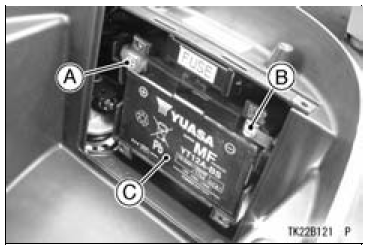
- (+) Terminal (with Protective Cap)
- (-) Terminal
- Battery
- Take the battery out of the case.
- Clean the battery using a solution of baking soda and water. Be sure that the cable connections are clean.
Battery Installation
- Place the battery in the battery case.
- Connect the capped red cable to the (+) terminal, and then connect the black cable to the (-) terminal.
NOTE
- Install the battery in the reverse order of the Battery Removal.
NOTICE
Installing the (-) cable to the (+) terminal of the battery or the (+) cable to the (-) terminal of the battery can seriously damage the electrical system.
- Put a light coat of grease on the terminals to prevent corrosion.
- Cover the (+) terminal with its protective cap.
- Install the removed parts.
Headlight
Headlight aiming should be done by an authorized Kawasaki dealer.
NOTE
- On high beam, the brightest point should be slightly below horizontal with the motorcycle on its wheels and the rider seated. Adjust the headlight to the proper angle according to local regulations.
Fuses
Fuses are arranged in the fuse box located battery case. If a fuse fails during operation, inspect the electrical system to determine the cause, and then replace it with a new fuse of proper amperage.
If the fuse fails repeatedly, there is something wrong with the electrical system. Have the motorcycle checked by an authorized Kawasaki dealer.
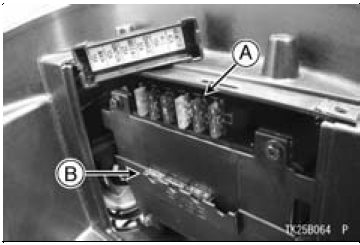
- Fuses
- Spare Fuses
WARNING
Substituting fuses can cause wiring to overheat, catch fire and/or fail. Do not use any substitute for the standard fuse. Replace the blown fuse with a new one of the correct capacity, as specified on the fuse.
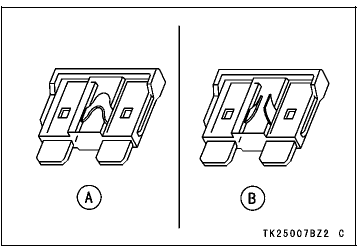
- Normal
- Failed
General Lubrication
Lubricate the points shown below, with either engine oil or regular grease, in accordance with the Periodic Maintenance Chart or whenever the vehicle has been operated under wet or rainy conditions.
Before lubricating each part, clean off any rusty spots with rust remover and wipe off any grease, oil, dirt, or grime.
Apply motor oil to the following pivots
- Side Stand
- Center Stand
- Front Brake Lever
- Rear Brake Lever
Lubricate the following cables with a pressure cable luber
- (K) Throttle Inner Cables
Apply grease to the following points
- (K) Throttle Inner Cable Upper Ends
(K): Should be serviced by an authorized Kawasaki dealer.
NOTE
- After connecting the cables, adjust them.
See also:
 Kawasaki J300 - Owner's Manual > Setting Table
Rear Shock Absorber Spring Preload Setting Wheels