 Kawasaki J300 - Service manual > Brake Pads
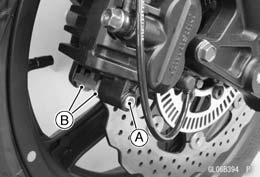
Front Brake Pad Removal
- Remove:
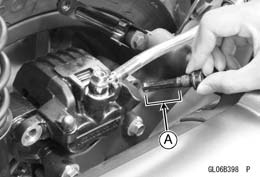
Pad Pin [A]
Brake Pads [B]
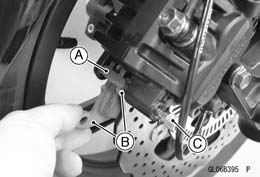
Front Brake Pad Installation
- Push the caliper pistons in by hand as far as they will go.
- Check that the pad spring [A] is in place on the caliper.
- Install the brake pads [B] and insert the pad pin.
- Apply a non-permanent locking agent to the threads of the brake pad pin [C].
- Tighten:
Torque - Brake Pad Pin: 18 N*m (1.8 kgf*m, 13 ft*lb)
WARNING After servicing, it takes several applications of the brake lever before the brake pads contact the disc, which could result in increased stopping distance and cause an accident resulting in injury or death.
Do not attempt to ride the motorcycle until a firm brake lever is obtained by pumping the lever until the pads are against the disc.
Rear Brake Pad Removal
- Remove:
Mud Guard (see Mud Guard Removal in the Frame chapter)
Rear Caliper Holder Pins [A]
Rear Caliper [B]
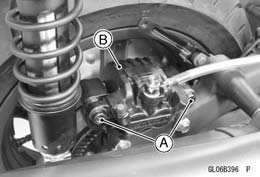
- Remove the brake pads [A].
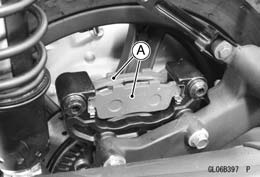
Rear Brake Pad Installation
- Push the caliper pistons in as far as they will go.
- Check that the pad springs are in place on the caliper.
- Install:
Brake Pads
Rear Brake Caliper - Apply silicone grease to the shaft [A] of the caliper holder pins.
- Apply a non-permanent locking agent to the threads of the caliper holder pins.
- Install the caliper holder pins.
WARNING After servicing, it takes several applications of the brake lever before the brake pads contact the disc, which could result in increased stopping distance and cause an accident resulting in injury or death.
Do not attempt to ride the motorcycle until a firm brake lever is obtained by pumping the lever until the pads are against the disc.
Brake Pad Wear Inspection
- Refer to the Brake Pad Wear Inspection in the Periodic Maintenance chapter.
See also:
 Kawasaki J300 - Service manual > Brake Lever, Brake Pedal, Calipers
Brake Lever, Brake Pedal Brake Lever Position Adjustment The brake lever adjuster has 4 positions so that the brake lever position can be adjusted to suit the operator's hand. Push the lever forward and turn the adjuster [A] to align the number with the mark [B] on the lever. The distance from the grip to the lever is minimum at number 1 and maximum at number 4.
Kawasaki J300 - Service manual > Master Cylinder
Master Cylinder Removal Remove: Rear View Mirror (see Rear View Mirror Removal in the Frame chapter) Upper Handlebar Cover (see Handlebar Cover Removal in the Frame chapter) Remove the brake hose banjo bolt [A] and remove the brake hose from the master cylinder. Disconnect the front brake light switch connectors [B]. Remove the clamp bolts [A], and take off the master cylinder as an assembly with the reservoir, brake lever and front brake light switch installed.