 Kymco XCITING 500 - Service Manual > Spark Plug
REMOVAL
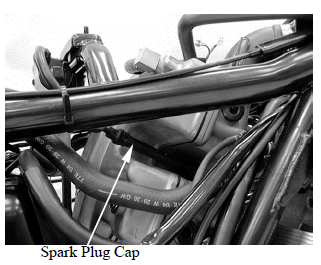
Remove the spark plug maintenance lid.
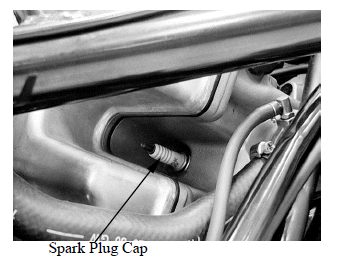
Disconnect the spark plug cap and clean around the spark plug base.
Clean around the spark plug base with compressed air before removing, and be sure that no debris is allowed to enter the combustion chamber.
Remove the spark plug using a equipped spark plug wrench or an equivalent tool.
Inspect or replace as described in the maintenance schedule.
INSPECTION
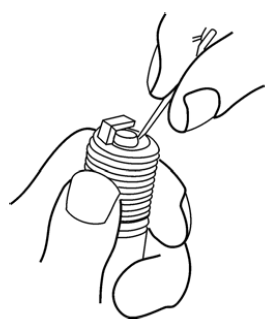
Remove the carbon deposits from the spark plug with a small wire brush or a spark plug cleaning machine.
The spark plug should be replaced periodically. Whenever removing the carbon deposits, be sure to observe the operational color of the spark plug's porcelain tip. This color tells you whether or not the standard spark plug is suitable for your type of usage.
A normal operating spark plug should be light brown or tan color. If the spark plug is very white or glazed appearing, then it has been operating much too hot. This spark plug should be replaced with the colder plug.
Recommended spark plug: NGK: CR8E
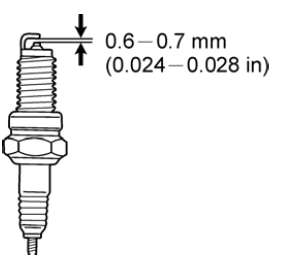
Measure the spark plug gap between the center and side electrodes with the feeler gauge.
If necessary, adjust the gap by bending the side electrode carefully.
Spark plug gap:
0.6-0.7 mm (0.024-0.028 in)
Install the spark plug in the cylinder head and hand tighten, then torque to the specification.
Torque: 12 N*m (1.2kgf*m, 9 lbf*ft)
Install the spark plug cap.
Install the removed parts in the reverse order of removal.
VALVE CLEARANCE
Inspect and adjust the valve clearance while the engine is cold (Below 35ÂşC/95ÂşF).
Remove the floorboard.
Remove the cylinder head cover.
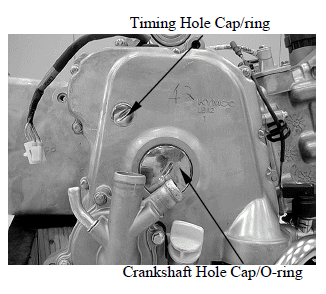
Remove the timing hole cap and O-ring.
Remove the crankshaft hole cap and O-ring.
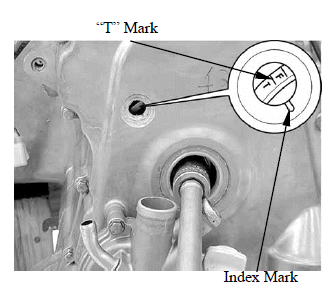
Turn the crankshaft clockwise and align the "T" mark on the flywheel with the index mark on the right crankcase cover.
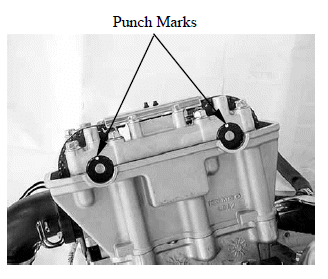
The punch marks on the camshaft should face upward as shown.
If the punch marks on the camshaft are facing downward, turn the crankshaft clockwise one full turn (360Âş) and the punch marks are facing upward.
Adjust by loosening the valve adjusting screw lock-nut and turning the adjusting screw until there is a slight drag on the thickness gauge.
Valve clearance (when cold):
IN.: 0.1 mm (0.004 in)
EX.: 0.1 mm (0.004 in)
Apply oil to the valve adjusting screw locknut threads and seating surface.
Hold the adjusting screw and tighten the lock nut.
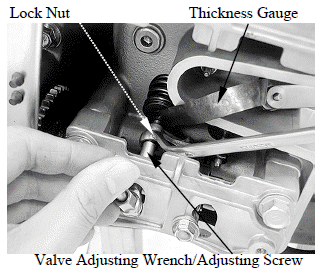
Special tool:
Valve adjusting wrench E012
Torque: 9N*m (0.9 kgf*m, 6 lbf*ft)
After tightening the lock nut, recheck the valve clearance.
Install the removed parts in the reverse order of removal.
See also:
 Kymco XCITING 500 - Service Manual > Fuel Line
Remove the floorboard. Check the fuel lines for deterioration, damage or leakage. Replace the fuel line if necessary. Do not smoke or allow flames or sparks in your working area.
Kymco XCITING 500 - Service Manual > Engine Oil
OIL LEVEL INSPECTION Start the engine and let it idle for 2-3 minutes. Turn off the engine and support the scooter level surface. Remove the oil filler cap/dipstick and wipe the oil from the dipstick with a clean cloth.