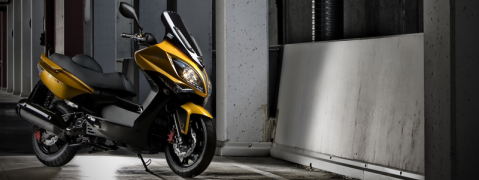
 Kymco Xciting 250i - Owner's Manual > Seat
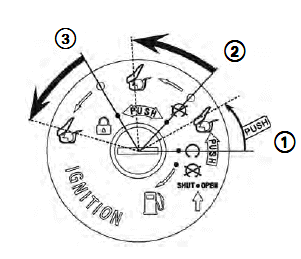
To unlock the seat " ":
":
- With the ignition key at the "
 "
position (the engine is running), push the key in and turn it
counterclockwise from "" to the
"" position.
"
position (the engine is running), push the key in and turn it
counterclockwise from "" to the
"" position. - With the ignition key in the "
 "
position (the engine is not running), turn the counterclockwise from the ""
to the "" position.
"
position (the engine is not running), turn the counterclockwise from the ""
to the "" position. - With the ignition key in the "
 "
position (the steering is locked), turn the key counterclockwise from the ""
position to the "" position.
"
position (the steering is locked), turn the key counterclockwise from the ""
position to the "" position.Pull up on the back portion of the seat to lift it up.
To lock seat:
Lower the seat and push down on the passenger section to engage the hooks 4 into the seat lock. Make sure the seat is secure before riding.
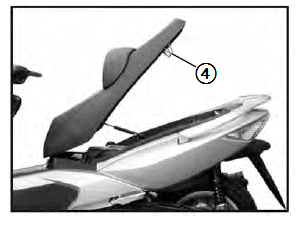
NOTE: The under-seat light and the "MET-IN" indicator light on the dash will light when the seat is unlocked. Make sure the seat is locked to prevent battery depletion.
Adjustable back-rest
The seat is equipped with a back-rest 1 that can be adjusted according to the rider's preference or physical condition.
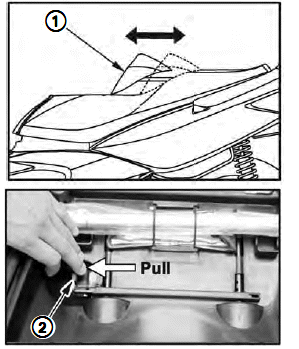
To adjust the back-rest:
Open the seat, pull the locking lever 2 left on the underside of the seat to move the back-rest to the desired position.
NOTE: After cleaning the scooter or riding it in the rain, wipe off any water from under the back-rest to keep the seat in good condition.
Center compartment
The center compartment is below the seat. To access the compartment see "Seat".
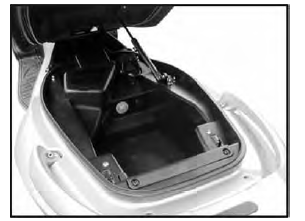
CENTER COMPARTMENT WEIGHT LIMIT: 22 lbs (10kg)
 Never exceed the maximum
weight limit, as vehicle handling and stability may be severely affected.
Never exceed the maximum
weight limit, as vehicle handling and stability may be severely affected.
The center compartment may become warm from engine heat. Do not store food, or flammable meterials, which are susceptible to heat damage in this compartment.
Do not direct pressurized water against the seat and center compartment joint, as water can be forced into the compartment.
Center compartment light
The center compartment light 3 will turn on automatically when the seat is opened. It will remain on as long as the seat is open, regardless of the position of the ignition switch.
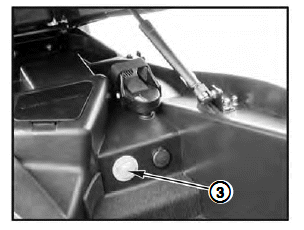
Cell phone power socket
Remove the cap 4 from the power socket and insert your 12VDV cell phone charger into the socket. The charging indicator light on the dash will illuminate to alert you that the charger is drawing power from the scooter.
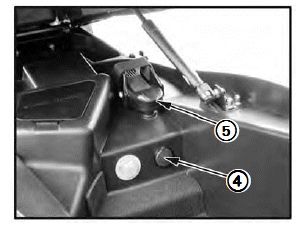
The socket's rated capacity is DC 12V, 10 Watts (0.8A) or less.
When the cell phone is recharged, unplug it and reinstall the socket cap.
See page 30 for information about the cell phone mount 5.
Cell phone mount
This scooter is equipped a mount to secure your cell phone while it is charging. The mount secures the phone in a horizontal position.
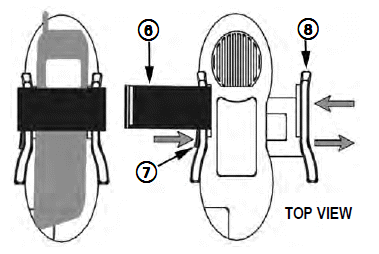
To secure the cell phone in the mount:
Open the hook-and-loop fastening band 6, then press the release button 7 to open the mount's pressure plate 8.
Set the cell phone flat on the mount and push the pressure plate in until it matches the width of the phone. Connect the fastening band and plug the phone's charger into the power socket.
NOTE: A cell phone charger is not included with your scooter.
 Do not add electrical
equipment that will exceed the accessory socket's capacity, as this may blow the
fuse (0.8A) for the cell phone socket.
Do not add electrical
equipment that will exceed the accessory socket's capacity, as this may blow the
fuse (0.8A) for the cell phone socket.
To avoid damaging your cell phone, follow the charging and use instructions provided by the phone's manufacturer.
See also:
 Kymco Xciting 250i - Owner's Manual > Fuel filler cap
To open the fuel filler cap: Insert the ignition key in the ignition switch and turn it to the ""position (the key cannot be removed in this position).
Kymco Xciting 250i - Owner's Manual > Helmet holder
To use the helmet holders, open the seat, and hook your helmet's fastener ring to the holder 1 and close the seat securely.