 Kymco Xciting 250i - Owner's Manual > Multifunction Meter
Multifunction Meter - Xciting 300i & 500i
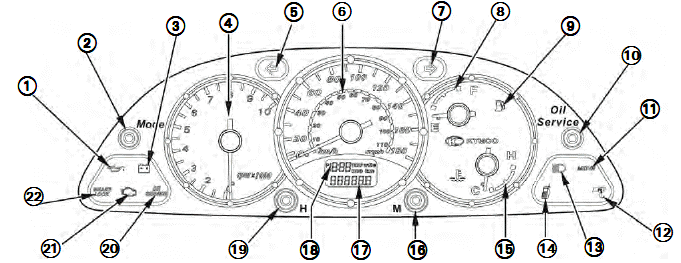
NOTE: The indicator needles of the multifunction meter's analog dials will sweep from zero to their maximum reading then back to zero when the ignition switch is turned "ON" (or when the battery is reconnected following service).
This is a normal function of this type of meter and is required to calibrate the dials before riding.
-
Oil pressure warning indicator "
 ":
This indicator lights when the oil pressure is below the normal operating
pressure.
":
This indicator lights when the oil pressure is below the normal operating
pressure.The indicator will light when the ignition switch is "ON"
 and the engine is not running. The indicator should go out when the engine
starts (except for some occasional flickering at or near idle when the
engine is warm). If the indicator fails to go out completely once the engine
is started, consult your KYMCO dealer immediately.
and the engine is not running. The indicator should go out when the engine
starts (except for some occasional flickering at or near idle when the
engine is warm). If the indicator fails to go out completely once the engine
is started, consult your KYMCO dealer immediately.
 Running the engine on your
scooter with insufficient oil pressure will cause serious engine damage.
Running the engine on your
scooter with insufficient oil pressure will cause serious engine damage.
-
Mode button: This button is used to select the trip meter, the odometer or to reset the tripmeter
-
Battery indicator: This telltale indicator lights when the battery voltage falls below 11 volts (indicating the need to diagnose a potential battery or charging problem)
-
Tachometer: Indicates the engine speed in revolutions per minute (RPM)
-
Left turn signal indicator
-
Speedometer: Indicates road speed in miles-per-hour (MPH). The meter face also indicates road speed in kilometers- per-hour (KPH)
-
Right turn signal indicator
-
Fuel level gauge
-
Fuel refill indicator "
 ":
This indicator lights when the fuel tank is near empty to alert the rider to
refill the fuel tank as soon as possible.
":
This indicator lights when the fuel tank is near empty to alert the rider to
refill the fuel tank as soon as possible. -
Oil service indicator reset button: The oil service indicator light can be reset by pressing the button. Do not press this button until the oil has been serviced so it can notify you when the next oil service is required.
-
Seat unlock indicator "MET-IN": If this indicator is lit, it means the seat is not locked in the closed position.
-
Side stand down indicator: This indicator will be lit if the side stand is in the down position.
-
High beam indicator
 Do not ride the scooter with
the side stand down as it could result in an accident.
Do not ride the scooter with
the side stand down as it could result in an accident.
-
Cell phone socket indicator: Lights when the cell phone recharging socket is being used
-
Coolant temperature gauge: Indicates engine coolant temperature when the ignition switch is "ON"
-
Minute adjust button: Push this button to adjust the minutes on the clock display
-
Odometer/Tripmeter: Press the 2 button to toggle between the overall and trip mileage, or to reset the tripmeter
-
Clock
-
Hour adjust button: Push this button to adjust the hours on the clock display
-
Oil service indicator: Lights when the scooter has reached the oil service interval mileage. The indicator also lights when the ignition is turned "ON" but should go out once the engine is running.
-
CELP indication (250i/Ri, 300i/Ri & 500i/Ri models): If flashing, it indicates that a fault has been detected in the scooter's EFI or electrical system. Requires immediate inspection by a KYMCO dealer.
NOTE: The CELP indicator lights momentarily when the scooter is turned "ON", before the engine is running.
It will also light if the engine is revved past its upper RPM limit. The scooter's ignition will begin to limit engine speed to reduce the risk of potential engine damage. The indicator will go out once the engine speed has returned to the normal range.
- Parking brake indicator (500i / 500Ri only): Indicates that the parking brake is engaged.
Right handlebar switch
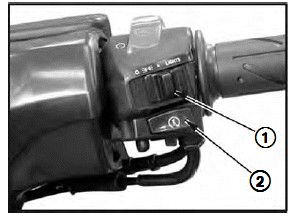
Headlight switch 1 " "
position:
"
position:
The headlight and taillight will be lit.
 The
position light and taillight (running lamps) will be lit.
The
position light and taillight (running lamps) will be lit.
"  " The headlight
and taillight will be off.
" The headlight
and taillight will be off.
NOTE: Not all Xciting scooters have switches that control the headlight circuit. Depending upon country and state regulations, your scooter's controls may differ from the switches described here.
Electric starter button 2 "  ":
":
Press the electric starter button to activate the starter motor.
NOTE: The starter motor will not engage unless a brake lever is squeezed at the same time the starter button is pressed. Your scooter is also equipped with an safety interlock that prevents the starter motor from being engaged unless the sidestand is fully up.
To prevent damage to the
starter motor, do not operate the starter motor for more than five seconds at a
time. If the scooter fails to start immediately, check the fuel level and the
battery condition, and allow the starter motor to cool before attempting to
start the engine again.

Engine stop switch 3 "  " position:
The ignition circuit is off. The engine will not start or run.
 The ignition circuit is on,
and the engine can start and run.
The ignition circuit is on,
and the engine can start and run.
Hazard switch 4 "  ":
":
Flipping this switch to the ""
position will cause all of the turn signals to flash together, indicating a
hazard to other traffic.
Returning the switch to "OFF" will cancel the hazard flashing.
NOTE: When either turn signal is flashing, the hazard switch will not work. The hazard switch will still operate when the ignition is "OFF"
Turn on the hazard flasher
switch when parking in a hazardous position or there is a special need to alert
other traffic. Once the hazard switch is turned on, it will not reset
automatically, so be sure to turn it "OFF" after use to avoid confusing other
traffic.
Do not leave the hazard
flasher on for a long period of time as it can deplete the battery's energy.
Left handlebar switch
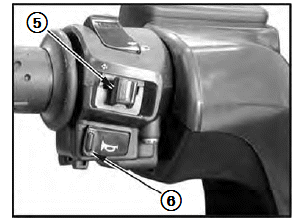
Turn signal switch 5:
Use the turn signal indicator to signal to other traffic your intention to turn or change lanes. The turn signal light on the dash will flash to alert the rider that the switch is engaged.
 for turning
to the "left".
for turning
to the "left".
 for turning
to the "right".
for turning
to the "right".
To cancel the turn signal, press the switch in when it is in the center position.
Horn button 6 "  ":
":
Press the horn button to sound the horn.
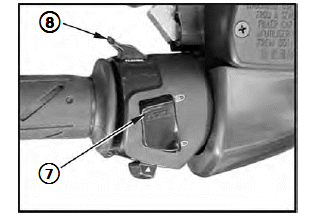
Dimmer switch 7:
 switch
position turns the headlight low beam on.
switch
position turns the headlight low beam on.
 switch position
turns the headlight high beam on and the high beam indicator light on the dash
is activated as well.
switch position
turns the headlight high beam on and the high beam indicator light on the dash
is activated as well.
Passing light button 8:
Use this button to rapidly flick the headlamp high beam on and off to signal other vehicles that you wish to pass.
See also:
 Kymco Xciting 250i - Owner's Manual > Serial Numbers
Vehicle identification number The vehicle identification number (also known as the VIN or frame number) is a 17-digit number stamped on the right side of the frame. At this same location is the VIN compliance label.
Kymco Xciting 250i - Owner's Manual > Brakes
Combination brake lever (left handlebar) Apply the front and rear brakes squeezing the left hand brake lever gently towards the grip. The brake light will illuminate when the lever is squeezed.